
SNOOP IN GRAY'S SECURITY ROOM
Award: Alarmist
SAVE GAME!!! You do not want him to catch you snooping in his room so be sure you exit before he catches you.
Enter Gray’s Security room and snoop around. If you proceed to his computer you will see 3 screens click on the keyboard and open the drawer.
New Task: “Power on Gray’s Computer”
Award: Charm location: Brown Metal Bird Charm.
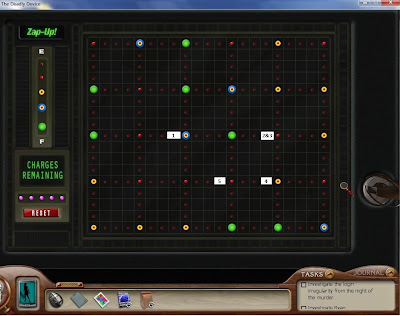
You will see that you need to do the zap-up puzzle to provide power and unlock the computer system for use. You have 5 charges to get all the little dots to light up Green.
Puzzle #2 – Solution: Click on the numbered buttons in the above order until all circuits are green (as shown on the picture)
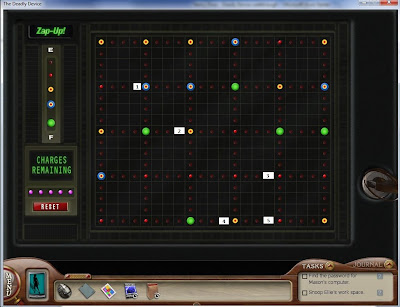
Master Puzzle #2: Solution
Check off: “Power on Gray’s Computer
Now The Computer Screens show a new puzzle to solve that involves the Binary Chart.
New Task: “Figure out the Password for Gray’s computer”
Be sure that you look at the binary poster on the 2nd floor before you try to solve this puzzle or the screen will not show the code to unlock.Puzzle # 3 – Solution: Nancy needs to get all the numbers shown on the clockwise wheel using the binary code.See illustration below for the answer.
This solution unlocks the computers for use.
Master Puzzle #3: Same solution as Amateur Puzzle #3.

Check off: “Figure out the Password for Gray’s computer”
Here we can view the logins, security, and key cards. Click on Logins – here is where you find the keycards used to access the lab. Nancy needs to find which number belongs to whom. Click the “next” arrow at the top right corner until you reach the end of the log sheet, Nancy determines that there is a number, from the night of the murder, that doesn’t appear anywhere else from the logs.Check off: “Figure out the Password for Gray’s computer”
Check off: “Investigate the login irregularity from the night of the murder”
Exit from the logins screen and click on the Security folder and enter in the Video # from the journal that Nancy wrote down LBTY510258 then click enter. It then brings up the footage of the video from the night of the murder. Press the play button at the top right hand corner and it will play through, which shows that no one else was there at the night of the murder, which leads you to believe that the evidence was tampered with.
Check off: “View the Security Video Mentioned in the Case File”
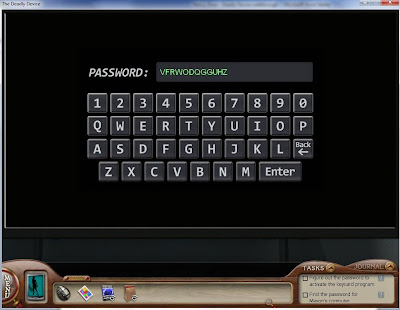
Next in order to find the password to make a new key card you will have to put some clues together. Remember the colored gears that you found all over the security room? Each gear has a color, a letter, and an arrow that points to a specific gear point. If you will notice, the amount of gear points on each gear are exactly 12 and each arrow points to a different part of the gear which look like the hours of a clock. You will need to find 12 gears. Locations and gear info is as follows.
12. Even though this is not number one, the puzzle starts as if 12 (just like a clock) is first so that is why I put it first. Location: Next to Gray’s jacket that is hanging up on the wall on the coat rack. V – Bright Green - 12
1. Location: Facing the wall that has the dry erase board in the security room, it is located on the upper left corner of the wall. F – Green - 1
2. Location: On the white dry erase board. R – Blue – 2
3. Location: In the security room, when you pull the drawer out at Gray’s desk it is on the front of the drawer. W – Yellow – 3
4. Location: If you were paying close attention this gear was located in Ryan’s workshop at the work desk. It is located on the workshop phone. O – Purple – 4
5. Location: On the door as you exit Gray’s security room. D – Purple – 5
6. Location: On the waste basket next to Gray’s Desk in the security room. Q – Orange – 6
7. Location: In the security room, when you pull the drawer out at Gray’s desk it is on the front of the drawer. G – Aqua – 7
8. Location: In the security room, when you pull the drawer out at Gray’s desk it is on the inside of the drawer. G – Red – 8
9. Location: To the right of Gray’s computer keyboard on his desk, it is located on the front of the keycard slot for creating new keys. U – Green - 9
10. Location: On the waste basket next to Gray’s Desk in the security room. H – Blue – 10
11. Location: On the white dry erase board. Z – Yellow – 11
The password for the computer is vfrwodqgguhz
New Task: “Figure Out the Password to Activate the Keycard Program”
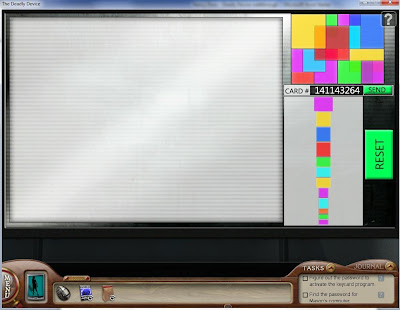
Look to the right of Gray’s keyboard and see a keycard slot. When you zoom in, place the small black knob on the top right hand corner of the desk into your inventory. Next, place the blank key card in the keycard slot, then back out of that screen and click on the top computer screen. Click on the “keycards”folder on his desktop and enter the password above. Here it will take you to a new puzzle, which is a bit more difficult.
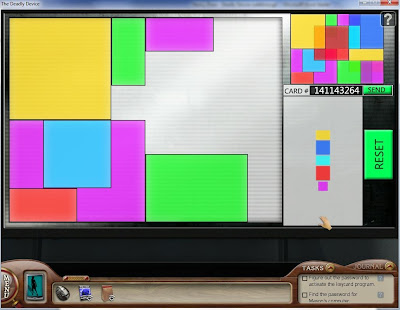
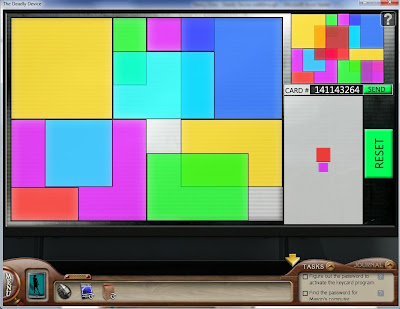
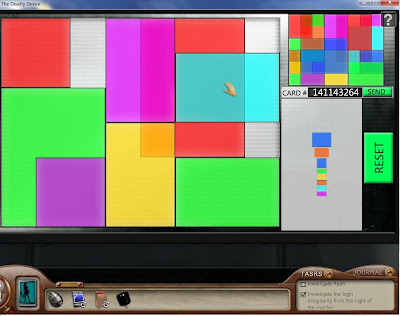
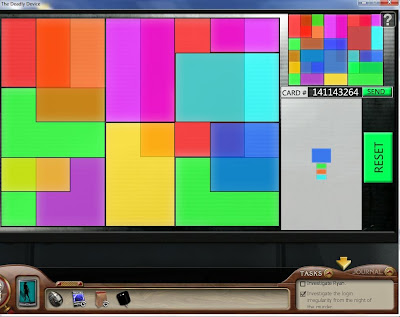
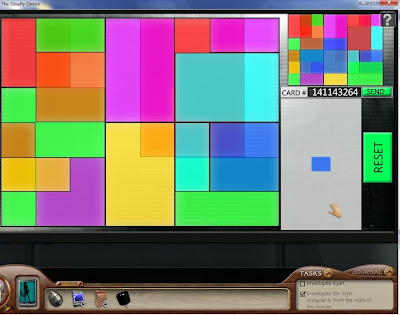
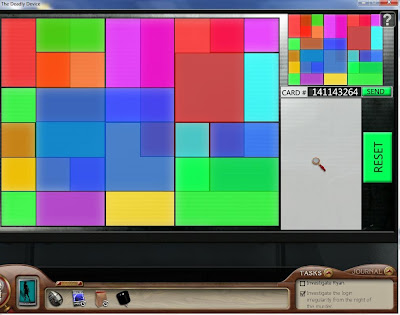
Puzzle #4: Solution: The purpose of this puzzle is to get all of the colored boxes in the EXACT same spot as the colored diagram.


Once you have the puzzle exactly as it should be pictured, click on the “Send” button next to the card number. Then retrieve the card from the slot where you put it before. If for some reason you get it wrong you will know when you use it on the Main Laboratory door, Nancy will say: “I guess this one doesn’t work!” Go and try again. When you succeed, the keycard box at the Main Laboratory door will beep once and turn green to allow entry.
Now let's go to: MASON'S COMPUTER, ELLIE'S OFFICE & THE LAB
Back to: HOME PAGE
No comments:
Post a Comment