
TRACK DOWN SOME NEW LEADS
Set time to daytime.
Next, you get a text from Ryan that she wants to talk. Go and talk with her.
As you leave, you get conked on the head by a metal art Tesla Coil and end up unconscious in the lab.
New Task: “Escape from the Lab”
You wake up in the lab and quickly stand up, you realize that the air is off and you need to get out of there fast.
SAVE HERE!!!
Turn around and see the intercom by the door click on it and hear that Ellie is also trapped, you can talk to her a couple of times but since the door is locked you will need to find an alternate way out. If you look around the room, see that the vent that had the red ribbon flowing from the airflow is no longer moving, click on the vent and it takes you up to the air ducts. Here you have a short amount of time to get through before you overheat.
SAVE HERE!!!
SAVE HERE!!!
Turn around and see the intercom by the door click on it and hear that Ellie is also trapped, you can talk to her a couple of times but since the door is locked you will need to find an alternate way out. If you look around the room, see that the vent that had the red ribbon flowing from the airflow is no longer moving, click on the vent and it takes you up to the air ducts. Here you have a short amount of time to get through before you overheat.
SAVE HERE!!!
Solution: Forward, straight at Blue 239, left at corner, right at blue 173, left at corner, left at red 121, right at intersection at red 025, right at intersection, left at blue 019, right at white 014, right at green 005, left at corner, Exit!
Master Solution: First left – right at corner –right at corner – left at corner – left at corner – right at red tag 121– left at T – left at corner, left at white 023, right at corner, right at corner, right at green 018, left at corner, left at red 015, right at corner, left at corner, left at corner, right at corner, right at corner, right at corner, right at corner, left at corner, right at T green 005, left at corner, Exit!
Listen to Gray and Mason. Nancy wonders what they are arguing about.
Check off: “Escape from the Lab”
Check off: “Escape from the Lab”
New Task: “Find out why Mason was in the Lab after hours”
Go to Gray’s Security room and hear paper shredding.
New Task: “Find out what Gray was shredding”
Go in and talk to Gray completely. Then go out and set the alarm so you can snoop in the shredder in his office. Go in and look at the shredder. Find the last cat leg, the kill switch for the Tesla Coil, and the shredded document that can be taped back together.
Puzzle 11: Go back to Nancy’s room and go to the desk to tape the document back together. Rotate all the pieces so that all the lettering is right side up and then piece together like a regular puzzle.
Solution:

Check off: “Find out what Gray was shredding”
Check off: “Track down some new leads”
New task: “From the shredded page, find out what’s been placed in “safe keeping”
Go upstairs and see that Ellie is gone, look at her desk. On the right side is a note that refers to some books.
New task: “Figure out the meaning of the list of book titles from Ellie’s desk”
Go to the lounge and look at the book shelf in the corner of the room.
1. Condemned Elephant’s name = Topsy the Performer
2. V=RI = Ohm’s Law in Circuit Analysis
3. Tesla’s Good Friend = The Complete Short Stories of Mark Twain
4. Element # 74 = The Tungsten Divide
5. Incorrect Radio Patent Holder = Marconi’s Trans-Atlantic Quest
6. 1893 Colombian Expo Site = Illuminated Chicago
7. Sagramor’s fellow Knight = Guinevere & Lancelot
Once you click on the right book order as stated above, Tesler’s picture frame opens up and you find another audio card and a journal
Check off: “Figure out the meaning of the list of book titles from Ellie’s desk”
New Task: “See what’s Inside Niko’s notebook”
Open Niko’s notebook and look through it.
Puzzle #12 - The solution to this puzzle lies in Binary numbers. Binary numbers are commonly written using the symbols 0 and 1. Using the chart below, scratch off all areas where 0 come us on the binary numbers For Example: The first number on the puzzle is 9. So you would scratch off the 2 center letters “A & S”.
Decimal Pattern (Hex Value) Binary Numbers
00000
10001
20010
30011
40100
50101
60110
70111
81000
91001
101010
111011
121100
131101
141110
151111
1610000
Puzzle #12 Solution: EVERY FIFTH LETTER ABOVE PLAY ON THE COIL.

Check off: “See what’s Inside Niko’s notebook”
New Task: “Play Niko’s song on the small Tesla Coil”
Let’s go listen to Niko’s 2nd diary on his personal player in his office. Listen to all 4 diary logs.
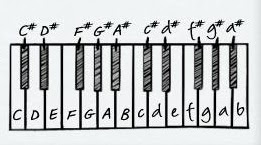
Puzzle #13: Now to the Main Lab to try out that song on the small Tesla Coil. Every 5th letter in his journal is as follows: AGBegagdBcGEFDC
If you go back to Mason’s office and look at his white dry-erase board you see that the upper and lower caps do mean something on the actual piano.

When you get it right, a compartment will open up and you will see a paper there to read.
Check off: “Play Niko’s song on the small Tesla Coil”
New Task: “Illuminate a black light under the glow”
Go and talk to Gray, then set the alarm for daytime. Go and talk to Ryan and Mason.
Check off: “Find out why Mason was in the Lab after hours”
Go into the Employee break room and see a phone on the table and a key card on the floor pick it up and place into your inventory. You need to figure out how to unlock the code by placing the colors correctly.
New Task: “Break into Ellie’s Cellphone”
Puzzle #14 if you remember, in the book on Ellie’s desk was the sticky note with her keycard number and then 3 circles that connect to each other that says: “Each set = 15” that must be the solution to getting into her phone. Each set of 3 circles = 15.
Puzzle #14 Solution: The sets are in a STRAIGHT set of 3. See picture below.


Read through the texts. Probably should talk to Mason.
Check off: “Break into Ellie’s Cellphone”
New Task: “Find out who the owner of the keycard from Mason and Ellie’s office is”
We need to check the keycard so let’s set the time to night. Go and talk to Gray completely and then pull the alarm so we can get into the security room. Put the keycard into the slot next to Gray’s computer keyboard and go to the computer screen and click on keycards. Nancy says that this is the card that was used the night of the murder.
Check off: “Find out who the owner of the keycard from Mason and Ellie’s office is”
Change back to daytime and talk to Ryan and Mason completely. Notice that Ellie’s cellphone is gone. Change back to night and go and talk to Ellie thoroughly.
Next, call Victor, Dierdre (and the Hardy Boys if you want).
Next on the To Do list is to “From the shredded page, find out what’s been placed in “safe keeping”". Since it was Gray that was shredding the document and the shredder was in Gray’s office, let’s go there and snoop around. Pull the alarm to get Gray out of the room and go into the security room. If you look at the shredded page, it shows what looks like a coat rack. Look on the wall that Gray’s coat is hanging on. Here we need to turn the coat hooks according to the paper.
Puzzle #15 – Coat Hanger Puzzle
Puzzle #15 solution: The coat hanger has 3 hooks, the one on the far right should go around 3 clicks. The middle hood should turn 5 clicks. The far left hook should turn 10 clicks.

Check off: “From the shredded page, find out what’s been placed in “safe keeping”
New Task: “View the video referenced in Gray’s lock box.”
Now let’s look at that video. Enter LBTY6510259. Discover that Gray was also there the night of the murder. Nancy notices a code in the corner.
New Task: “Figure out what the extra data showing on the video with Gray means."
Check off: “View the video referenced in Gray’s lock box.”
11101001 These numbers show that it is a data set.
Go and talk to Gray thoroughly after he returns, he may kick you out but talk to him again. Go and talk to Ellie. Change to daytime and go to the workshop. Here you can put the cat together and pet it a few times. Then talk to Ryan, she finds out that the video was tampered with and leaves.
Check off: “Figure out what the extra data showing on the video with Gray means. “
When you exit, an alarm sounds and a warning is issued that there is a security breach in the Tesla lab.
New Task: “Track down the source of the alarm”
Go to the Tesla Lab to investigate.
Here you see Mason working on the Tesla Machine. You need to shut down the machine. We are back to the initial puzzle. You need to find out how to turn off all the power.
Check off: “Track down the source of the alarm”
New task: “Save Mason”
Puzzle #16:


Puzzle #16 Solution: press the following numbers in order as they appear above.16,8,3,5,10,15,16,16


Master Puzzle #16 Solution:press the following numbers in order as they appear above. 6, 7, 13, 16, 9, 12
Now to: FIND OUT WHO REALLY KILLED NIKO
Master Puzzle #16 Solution:press the following numbers in order as they appear above. 6, 7, 13, 16, 9, 12
Now to: FIND OUT WHO REALLY KILLED NIKO
Back to: HOME PAGE
No comments:
Post a Comment