Search This Blog

Sunday, November 25, 2012

WELCOME!

Welcome to my Blog!


Hello, I am Toad Hopper, an AVID Nancy Drew fan. This is my 3rd walkthrough, because I have played and beaten every Nancy Drew Game out there so far and I know that sometimes it really sucks to get stuck and not know what to do. I know that thorough walkthroughs are limited and you have to search so many different sites to get the information you need. I also know that it would be super convenient to have a thorough walkthrough just on one site. So I decided to do my 3rd walkthrough due to the response to my last blog, Trail of the Twister and my 2nd blog, Secrets Can Kill: REMASTERED by the general public. I took a lot of time and have put this walkthrough together to the best of my knowledge and actually had a lot of fun doing it. I am also fairly new to blogging. So I hope that I can set this up so it is easily accessible as well as organized. I would appreciate any feedback good or bad and I will do my best to make any changes. I also encourage you to let me know if I am missing anything, or if you know of any other cheats/hints that need to be inputted. If this walkthrough is a success, I may post walkthroughs of other needed Nancy Drew games at your request. Thank you for your feedback, hope this helps.

THIS BLOG IS THE THOROUGH WALKTHROUGH FOR NANCY DREW: The Deadly Device

 
Lets move on to: GETTING STARTED
Back to: HOME PAGE

GETTING STARTED


GETTING STARTED

Hello all, this is my 3rd walkthrough, I decided to do this because frankly I have tried to get thorough walkthroughs before and find them somewhat left to be desired. So, here goes. Let me know what you think…

First of all for those of you who are Nancy Drew fans and know how it all works, I have added specific SPOILERS to separate links throughout. For example: For all of you who want to find all of the AWARDS for the end of the game you can go to this link and it will take you step by step to the awards screen.

Getting Started:
Game starts out talking to Victor Lossett, the laboratory co-owner who has hired you to find out if Niko Jovic a brilliant scientist was murdered.
Once the game begins you must choose your level of expert:
1.) Junior Detective
2.) Senior Detective
For this walkthrough, I have done something different. I have done the walkthrough solutions for BOTH the Junior and Senior Detective.

This is the first game that you do not begin the game at Nancy's desk! You find yourself viewing the events of the murder you will be investigating. You will have a few things in your possession, which appear on the bottom left of the screen. You have your inventory which is the bottom bar across the screen, where you can open and use, read, or select the items seen. If it has an eye, you can look at it closer – for example read a letter. You can also select something in your inventory by clicking it and clicking on something to use it on – for example a key to open a locked drawer, you would click on the key in your bag and then click on the lock on the door and it will automatically unlock. Next to the inventory you have your journal, which has observations, and suspect information. These can come in helpful if you get caught in what seems to be a dead end. Next is your Task List, which when you are a Senior Detective, is disabled. Finally you have your cell phone. This can come in very useful at times.

To operate your cell phone you click on it. You have 5 options from there - phone, camera, games, settings and messages. Phone will take you to your cell phone, where you can make a phone call to your friends Frank and Joe Hardy and to Victor Lossett. To make a call to a contact, click their picture and then click on "call".
Click on menu to go back to the first screen.
Camera will take you into picture mode. There is no game requirements for picture taking in this particular game.

Next you can click on games and play 4 different games on your cell phone.

Settings allows you change your wallpaper, ringback and message sound.

Finally, Messages is just that, it shows you the incoming text messages, unfortunately, you cannot send any text messages in this game. Use the right/left arrow to scroll through the different text messages if you need to view them.

On the bottom left of the screen features the menu button: from here you can choose, the main menu, save a game, load a game, game settings, help and resume game. Pretty self-explanatory right? I guess if you need help with these, post a comment, and I would be glad to help. :)

HINT: Save regularly on many different slots, that way if you miss something and have to go back you will be able to start from a previous save rather than overwriting the last data and only have 1 saving point.

One last thing: When you are looking around, your magnifying glass will light up white when you can take a closer look, when you can use or take something it turns into a hand, when it turns into an arrow you can switch camera angles.

Ready to get started?

Let's move on to: MEET, GREET, AND SNOOP - DAY 1
Back to: HOME PAGE


MEET, GREET, AND SNOOP - DAY 1

MEET, GREET, AND SNOOP - DAY 1


This particular game does not have specific scenes or areas that give you an easy way to divide it up into an organized manner, so I decided to organize it based on a generalized To-Do list. So for this first page, we will focus on meeting all the characters and snooping through all the accessible areas during the first Day before we have to change the alarm. Puzzle Solutions will be listed on separate pages to avoid SPOILERS. There will be 2 puzzle solutions (if required) for Senior and Junior Detective solutions.

NOTE!!! The tasks highlighted in RED are tasks that are required for the Senior Detective, otherwise, the tasks are only for the Junior Detective.

NOTE!!! I covered over the SPOILERS with black, if you want a hint but not the solution, you can highlight where it is blackened and you can get a hint, otherwise if you need more than a hint and need the solution you can go to the AWARDS page or to the individual puzzle page.

Game starts out talking to Victor Lossett, the laboratory co-owner who has hired you to find out if Niko Jovic a brilliant scientist was murdered.
New Task: Read the Case File

After finishing the phone conversation enter Niko’s office and go to the desk, look in the desk drawer and it goes to a close up of the lock mechanism.Enter the code that Victor gave you (which is also located in the journal under observations). The number to enter is 171943.The drawer opens and you see a blue case file to review . Once you review it the journal will update the needed info.
Check off : Read the Case File

New Task: Investigate Ryan
New Task: Investigate the login irregularity from the night of the murder

New Task: “Meet Everyone at the Lab”
New Task: “View the Security Video Mentioned in the Case File”

New Task: “Explore the Halls”
If you click on the box on the desk, you notice that it needs to be repaired.

Award:Easter Egg – For finding a secret surprise

Award:Pigeon Handler
At the side of the room is a glass case with candy in it, you notice that you need the opening mechanism.

At the other side of the room is a hutch with locked doors, it looks like you need a key in order to open it. You also need to get the opening mechanism for the glass candy case.
You can look at each side shelf of the hutch as well as the left corner of the room.

Check off the list: "Explore Niko’s Office."
Exit the office and lets go explore the halls and meet everyone at the lab. The observation journal states that Gray and Ellie work at night and Mason and Ryan work during the day. Since it is daytime now, let’s go and meet Mason and Ryan. Enter the elevator and go to the 2nd floor. Enter the double blue doors to the right hall, here you meet Ryan by almost avoiding death by a flying bolt.Talk with her and explore the room.

Work table has an area to work with tools, but nothing to interact with yet.
There is an upper cupboard that opens where you can get a blank key card that is sitting on the inside lip of the door. There is also a paper with colored squares that will come in handy that is located on the lower shelf between the binders.

New Task: “Use the Keycard to Get Past a Locked Door”
To the right is a blue toolbox with a work area and tools, but nothing to interact with. Then look closely at the motorcycle and click on it to interact with Ryan again.

Award: Phone Charm location: Skull Charm

Award:Charmed
Check off the list: "Explore tech workshop".

Exit room and let’s go visit with Mason. As you exit Ryan’s workshop, you can look at the binary chart for reference. You can also go to the dark metal double doors of the Main Laboratory and click on the box to the right of the doors and see that you need a card to get into the lab.
New Task: "Find Something to Open the Locked Lab"

Since you already found the keycard you can check off the List: "Find Something to Open the Locked Lab"
Mason’s office is located at the other end of the hallway inside the orange single door.

Award: Phone Charm location: green gummy bear.
Go straight into to the employee break room. Pick up the book on Tesla coils.

Mason will not allow you to enter Ellie’s cubical, so go in and talk to him. He is so pleasant!
New task: “Snoop Mason’s workspace” - gonna have to wait until nighttime to try that. Take a look at the dry-erase board next to his office desk, Nancy notices in her notes that it may hold a few clues.
 Let’s go to Nancy’s room and lounge and set the alarm for night. Nancy’s room is in the room in the double gray doors in the hallway to the left of the elevator.

On to: MEET, GREET, AND SNOOP - DAY 2

Back to: HOME PAGE


MEET, GREET, AND SNOOP - DAY 2

MEET, GREET, AND SNOOP - DAY 2

New Task: “Explore the Lounge”
 
As you enter the power goes out and she gets a phone call from Victor about the power outage, after the phone call ends, simply go straight through the hallway with a bit of complaining from Nancy about stubbed toes and bumped knees until she gets to the bedroom. Click on the alarm and set it to night.

Nancy is woke up by an alarm, exit the room and when she opens the door Gray tells her to follow him.
SAVE HERE!!!

Pull two wires off the lower power levers and Nancy places them in the evidence bag. Next is the first puzzle:
Amateur Puzzle #1 :
 
 Amateur Puzzle #1 Solution:


Master Puzzle #1:


Master Puzzle #1 Solution:


Check off: “Power off the electric grid.”
Gray tell you “Nice work, now get out”. You exit the lab and now you can go visit with Gray in the security room. Take an immediate right up the stairs and have a chat with Gray. Notice when you enter the security room, you see a white erase board as well as several colored gears with letters. Take note of the gears.
New Task: “Snoop the Security Booth”
Exit the Security office, as you exit, notice the cork board with the posters on it. Click on it and zoom in to take note of the Table of Elements. The next doorway you come to is marked “Main Laboratory” – When you try to enter, it is locked. If you look at the small box to the right of the door, you will see that it is to be opened by a keycard

New Task: Find a way into the Lab”
Let’s now go and meet Ellie on the 2nd floor. She shows you how the Tesla coil works and you get first hand experience.

New Task: “Snoop Ellie’s Workspace”
Try to go into Mason’s office, and Ellie will tell you if you beat Mason’s score on the Aggregation machine she will let you snoop.

Check off: “Meet Everyone at the Lab”
New Task: “Get the High Score on the Aggregation Arcade Game”

Let’s go back to the 1st floor and explore Nancy’s room and the lounge and beat Mason’s score on the Aggregation Machine.

Award:  Phone Charm location:Metal Robot.

Once in Nancy’s room and lounge notice the bookshelf to the left, nothing to interact with. Notice the picture on the wall, nothing to interact with. You can get a closer look at the work table, but nothing yet to work on. All Nancy says is “Hmmm”. Turn behind you and see an arcade game of“Aggravation” that you can play. Go over to the kitchen area and see that the electric burner is missing a knob – need to keep an eye open for that.You can click on the cereal box but only look at it.  Continue to Nancy’s bed and use the bathroom if you like, she does say some funny things. In the bedroom, you can look in the center locker and read through the book on Tesla.

Award:  Phone Charm location:Planet Charm.
Playing Aggravation Game: This takes about 15 minutes to beat Mason’s score of 22,500 for Amateur, and 31,575 for Master. Read the instructions where the question mark is on the arcade game for how to beat it. It requires patience but persistence will clear out the board.

Award: Gamer – Playing the boards
Check off:“Get the High Score on the Aggregation Arcade Game”

Check off:“Explore the Lounge”
Once you beat Mason’s score, go back and talk to Ellie and she will let you snoop in Mason’s workspace. You can mess up Mason’s neat and orderly desk to get a reaction.

Award:  Imperfectionist
Click on his computer to see that his computer requires a password for access.

New Task:“Find the Password for Mason’s Computer”
If you click on the pink sticky note, it has the numbers 153472125, which is his security key number.

You can also look on the top of his computer tower and see a book on biometrics. Notice Mason’s book states how to create an etching of the fingerprint sample.
Check off: “Snoop Mason’s workspace”


Now let’s go SNOOP IN GRAY'S SECURITY ROOM

Back to: HOME PAGE

SNOOP IN GRAY'S SECURITY ROOM

SNOOP IN GRAY'S SECURITY ROOM

Go back to the 2nd floor and just next to Nancy’s Room and Lounge, you can see what looks like an alarm button. Push it and you will hear footsteps which indicate that Gray has just left his Room to go and fix the alarm. This gives you 8 minutes before he catches you in his office.

Award: Alarmist

SAVE GAME!!! You do not want him to catch you snooping in his room so be sure you exit before he catches you.
Enter Gray’s Security room and snoop around. If you proceed to his computer you will see 3 screens click on the keyboard and open the drawer.
New Task: “Power on Gray’s Computer”
Award:  Charm location: Brown Metal Bird Charm.
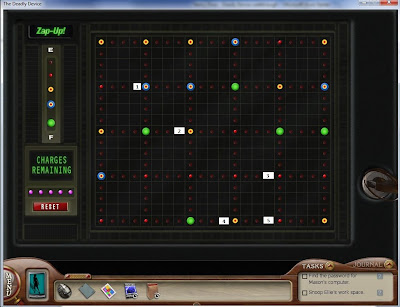
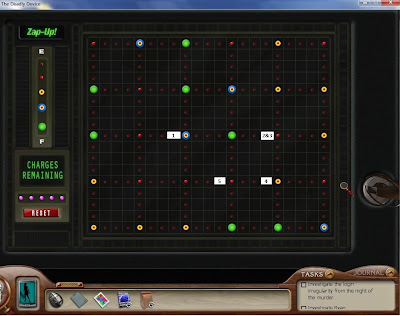
You will see that you need to do the zap-up puzzle to provide power and unlock the computer system for use. You have 5 charges to get all the little dots to light up Green.
Puzzle #2 – Solution: Click on the numbered buttons in the above order until all circuits are green (as shown on the picture)


Master Puzzle #2: Solution

Check off: “Power on Gray’s Computer

Now The Computer Screens show a new puzzle to solve that involves the Binary Chart.
New Task: “Figure out the Password for Gray’s computer”
Be sure that you look at the binary poster on the 2nd floor before you try to solve this puzzle or the screen will not show the code to unlock.

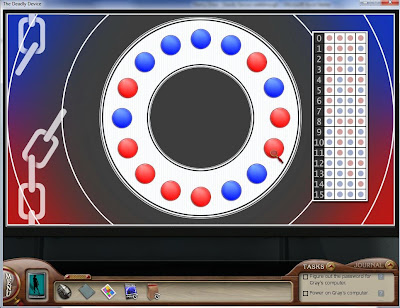
Puzzle # 3 – Solution: Nancy needs to get all the numbers shown on the clockwise wheel using the binary code.See illustration below for the answer.

This solution unlocks the computers for use.
Master Puzzle #3: Same solution as Amateur Puzzle #3.


Check off: “Figure out the Password for Gray’s computer”
Here we can view the logins, security, and key cards. Click on Logins – here is where you find the keycards used to access the lab. Nancy needs to find which number belongs to whom. Click the “next” arrow at the top right corner until you reach the end of the log sheet, Nancy determines that there is a number, from the night of the murder, that doesn’t appear anywhere else from the logs.
Check off: “Investigate the login irregularity from the night of the murder”
Exit from the logins screen and click on the Security folder and enter in the Video # from the journal that Nancy wrote down LBTY510258 then click enter. It then brings up the footage of the video from the night of the murder. Press the play button at the top right hand corner and it will play through, which shows that no one else was there at the night of the murder, which leads you to believe that the evidence was tampered with.
Check off: “View the Security Video Mentioned in the Case File”
Next in order to find the password to make a new key card you will have to put some clues together.  Remember the colored gears that you found all over the security room? Each gear has a color, a letter, and an arrow that points to a specific gear point. If you will notice, the amount of gear points on each gear are exactly 12 and each arrow points to a different part of the gear which look like the hours of a clock. You will need to find 12 gears. Locations and gear info is as follows.
12. Even though this is not number one, the puzzle starts as if 12 (just like a clock) is first so that is why I put it first. Location: Next to Gray’s jacket that is hanging up on the wall on the coat rack. V – Bright Green - 12
1. Location: Facing the wall that has the dry erase board in the security room, it is located on the upper left corner of the wall. F – Green - 1
2. Location: On the white dry erase board. R – Blue – 2
3. Location: In the security room, when you pull the drawer out at Gray’s desk it is on the front of the drawer. W – Yellow – 3
4. Location: If you were paying close attention this gear was located in Ryan’s workshop at the work desk. It is located on the workshop phone. O – Purple – 4
5. Location: On the door as you exit Gray’s security room. D – Purple – 5
6. Location: On the waste basket next to Gray’s Desk in the security room. Q – Orange – 6
7. Location: In the security room, when you pull the drawer out at Gray’s desk it is on the front of the drawer. G – Aqua – 7
8. Location: In the security room, when you pull the drawer out at Gray’s desk it is on the inside of the drawer. G – Red – 8
9. Location: To the right of Gray’s computer keyboard on his desk, it is located on the front of the keycard slot for creating new keys. U – Green - 9
10. Location: On the waste basket next to Gray’s Desk in the security room. H – Blue – 10
11. Location: On the white dry erase board. Z – Yellow – 11
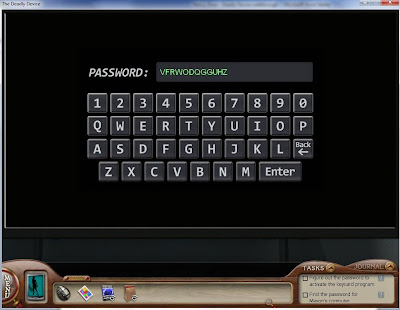
The password for the computer is vfrwodqgguhz

New Task: “Figure Out the Password to Activate the Keycard Program”
Look to the right of Gray’s keyboard and see a keycard slot. When you zoom in, place the small black knob on the top right hand corner of the desk into your inventory. Next, place the blank key card in the keycard slot, then back out of that screen and click on the top computer screen. Click on the “keycards”folder on his desktop and enter the password above. Here it will take you to a new puzzle, which is a bit more difficult.
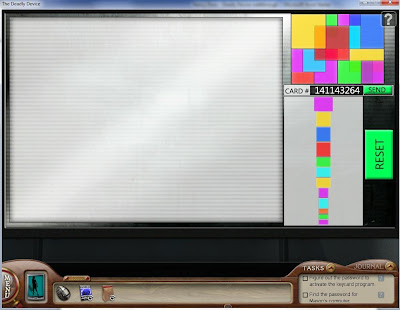
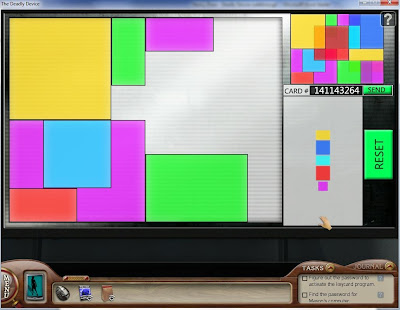
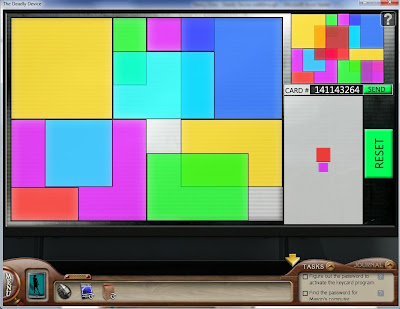
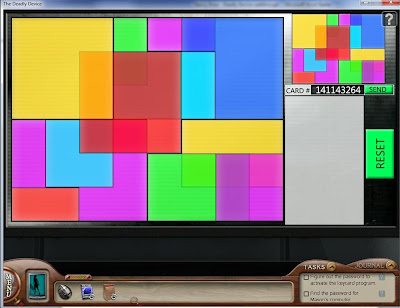
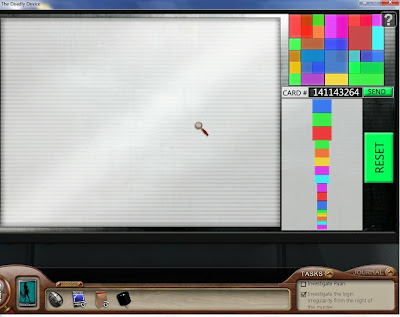
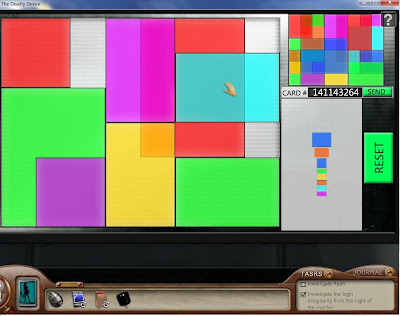
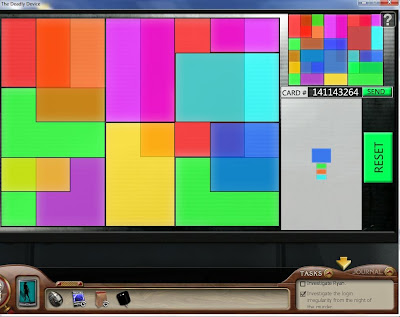
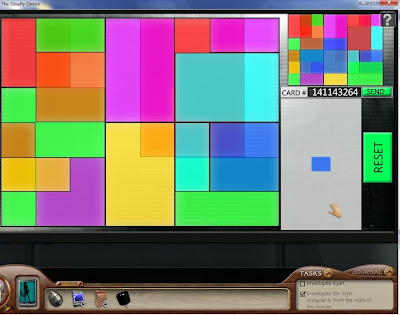
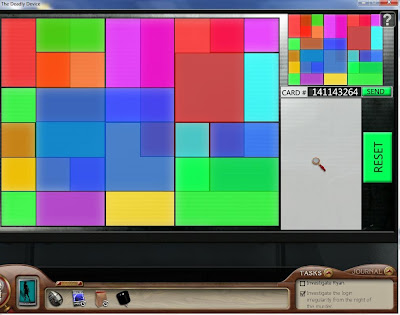
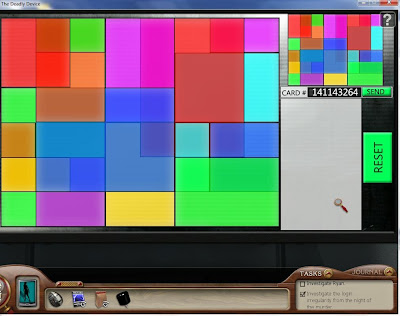
Puzzle #4: Solution: The purpose of this puzzle is to get all of the colored boxes in the EXACT same spot as the colored diagram.


Master Puzzle #4: Solution


Once you have the puzzle exactly as it should be pictured, click on the “Send” button next to the card number. Then retrieve the card from the slot where you put it before. If for some reason you get it wrong you will know when you use it on the Main Laboratory door, Nancy will say: “I guess this one doesn’t work!” Go and try again. When you succeed, the keycard box at the Main Laboratory door will beep once and turn green to allow entry.

Back to: HOME PAGE

MASON'S COMPUTER, ELLIE'S OFFICE & THE LAB

MASON'S COMPUTER, ELLIE'S OFFICE & THE LAB

 
Check off: “Find a way into the Lab”

Check off: “Figure Out the Password to Activate the Keycard Program”
Check off: “Use the Keycard to Get Past a Locked Door”

Check off: “Snoop the Security Booth”
Check off: “Explore the Halls”

Puzzle #5: Let’s go back and try to solve the puzzle in order to gain access to Mason’s computer. Go to his cubicle and look at the white dry erase board.Most of the gibberish we probably wouldn’t understand but if you really look at it there are quite a few clues. At the far bottom left corner there is a hangman diagram and 2 separate words. One of the words has a hyphen and the other does not. So this is a clue that it is someone’s thing. Now, the color of the hangman diagram is orange, and if you look at the other writing on the board you see many individual letters on the board in orange. Count the spaces of letters you need to complete the puzzle and count how many letters there are on the board and what do you know? A perfect match.
Solution: You find the following letters:EEOMANTWOLSSTH (14 letters in all)

If by the process of elimination: Mason’s for a first word does work but it leaves nothing useful for the 2nd word, the other characters: Ellie, Gray, Niko, and Victor do not spell out. So what is the place that they work all about? Tesla. What do you know. That name fits! So, remove “Tesla’s” name out of the letters available and what you have left is: EOMNTWOH. If you unscramble the letters, you come up with: HOMETOWN.
Answer: Tesla’s Hometown.

You can find that information by going back to Nancy’s bedroom and looking at that book in the center locker by her bed and find out where he was from which is: Smiljan.
Go back to his cubical and enter the password which gives you full access to his computer.

Check off: “Find the Password for Mason’s Computer”
You can click on Composite Designer although you do not have use for that as of yet.

You can click on Record Repository for information.
You can click on the deleted item and Nancy sees that she needs to follow up on the video that shows that Ryan should never have been released.

New Task:“Figure Out What the Video File Referenced on Mason’s Computer Shows”
Finally you can click on the game “Composite Craze” and play if you want.

Go back down and pull the alarm so Gray will leave the security room and go in to check out the video that Mason’s referenced. Video# HLLW510257. Click play and notice that Ryan is bypassing the security system.
Check off: “Figure Out What the Video File Referenced on Mason’s Computer Shows”

As Nancy leaves the Security office, Nancy notices as she walks by the Main Laboratory, a weird sound. She says “That doesn’t sound good, Ellie might want to know about this!” Let’s go talk to Ellie.
New Task: “Inquire After the Loud Humming Near the Lab”

When you bring up the noise to Ellie she leaves and makes it very easy for your to snoop in her office.
Check off: “Inquire After the Loud Humming Near the Lab”

Let’s have a look-see. You can click on the picture frame of the girl. Pick up the book “Connecticut Yankee” turn the page and find a yellow sticky note with circles and the number 198257112 with the words “Each set = 15”. Master: “Each set = 21” Click on the desk drawer in the center of the desk and find a key, a note about the reminder hints to this month’s passcode, and an 8GB memory card.
New Task: “Find a Way to Listen to the Audio Card”

Now go to her computer and click on the “Computer Code”Folder. Scroll through the data, but see no useful information. Go to the right side of her desk and find a plastic container of Capacitors, select them for your inventory. Read the letter on the cork board from Ellie’s cousin.
Check off: “Snoop Ellie’s Work Space”

Exit Ellie’s office and go down and look around in the Main Laboratory.
New Task: “Explore the Lab”

Lots of places to look here, so we will explore from the left of the double door as you look straight at them and go around the room to the right of the double doors. First, take a closer look at the machine with the plastic black cover that opens. Take a close look at it as it has a screen showing “No Files in Queue” on the left and the plastic cover opens on the right. Also, look at the book “Battle of the Currents” on the shelf to the right. Back up from there and look closely at the large machine with the glowing blue domes, no interaction there. Next, look at the far panel to the left with the levers and lights with the sticker “Danger, High Voltage”, no interaction there. Back up and pan the room left. Skip the metal exit door for now and move on to the contraption just left of the upright toolbox. If you click on the box part the doors will open and if you click on the spigots with the doors closed it resembles some sort of shaking machine, as you turn more spigots the more intense shaking occurs. Back up and pan left, you will next come across a machine with dials on it, no interaction here, but to the left of the machine on the table you can pick up a leather booklet on Etching Solutions which will prove very useful. Back up, pan left again, and just to the left of the machine is a messy workstation with a couple of white jugs. Locate and pick up the glass beaker for future use. Back up, pan left and you will next see, to the right of the yellow door, a set of 3 cylinders with gauges; no interaction here. Skip the yellow door for now and continue to pan left. To the left of the yellow door is another contraption which is a small Tesla Coil, that you can interact with but it does not seem like you have the parts yet, all Nancy says is “Hmmm”When you click on the flat black screen, Nancy says, “Something must be broken”. Back up again and pan left.
New Task: “Repair the Small Tesla Coil in the Lab”

Puzzle #6: Next you will see a glass case with a lock on it. Nancy says that the red must mean it’s locked. The point of this puzzle is to get all the squares blue.
New Task: “Unlock the Supply Cabinet”

Puzzle #6 Solution:

Master Puzzle #6 Solution:

Check off: “Unlock the Supply Cabinet”

Cannot interact yet. Back up and pan left. Just left of the Supply Cabinet, is a sink with chemicals. Nancy makes a comment that this looks dangerous, she better know what she’s doing before she starts. So it would be a good time to SAVE, as we don’t want to blow up!

SAVE HERE!!!
If you notice, there seems to be a bottle missing.

New Task: Find the Missing Bottle of Hydrofluoric Acid”
Go back to the Supply Cabinet and pick up the Acid.

Place it on the shelf with the other chemicals.
Check off: "Find the Missing Bottle of Hydrofluoric Acid”

It should seem obvious that we will need to use that bottle to make a concoction of some sort so we should probably figure out what what“HF”means. Go out to the hallway and look at the Table of Elements on the Bulletin board.

HF – Stands for Hydrogen Fluoride. If you look in your inventory you will see in the Leather booklet on etching solutions that there are 3 Hydrofluoric Acid mixtures, 2 being the same with different measurements and 1 being different. Under normal circumstances we would pick and choose and finally find one that works. This particular time, I am going to choose the one that is different. The “Si” solution for Amateur Detective is with 3 parts Hydrofluoric Acid, 1 part Nitric Acid, and 4 parts Water. For Master Detective is with 2 parts Hydrofluoric Acid, 2 parts Nitric Acid, and 1 part water. Nitric Acid is Nitrogen Dioxide and Water which if you look again at the periodic table or HN03 would be that mixture along with Water, which is H2O.
Let’s mix them up. Amateur: Take the “HF” Container and pour it into the little measuring cup with the 3 on it and dump it into the white beaker, Take the “HNO2” Container and pour it into the little measuring cup with the 4 on it and dump it into the little measuring cup with the 3 on it and that will leave you with the 1 part that you need to add into the white beaker solutions. Finally, take the “H2O” Container and pour it into the little measuring cup with the 4 on it and dump it into the white beaker solution. Master: Take the “HF” Container and pour it into the little measuring cup with the 4 and dump it into the little measuring cup with the 3 on it and that will leave you with the 1 part that you need to add into the white beaker solution. Dump the remaining amount back into the “HF” container and repeat the step again so the paper above the sink shows “2”parts measured. Take the “HNO3” Container and pour it into the little measuring cup with the 4 on it and dump it into the little measuring cup with the 3 on it and that will leave you with the 1 part that you need to add into the white beaker solution. Dump the remaining amount back into the“HNO3” container and repeat the step again so the paper above the sink shows“2”parts measured. Finally, take the “H2O” Container and pour it into the little measuring cup with the 4 on it and dump it into the little measuring cup with the 3 on it and that will leave you with the 1 part that you need to add into the white beaker solution.

Once the solutions are made properly, take the beaker and pour it into one of the brown bottles that are sitting on the shelf above the water. Put the solution in your inventory and let’s move on.
Award: Chemist

Check off: ”Explore the Lab”
Now we are back to the right side of the double doors so let’s go and take a look in the Photo lab (Yellow Door).

New Task: “Explore the Photolithography Lab”
New Task: “Unlock the supply cabinet in the photolithography lab.”

Use the key on the upper cupboard, and get a new wafer.

Award:  Charm location: Gear phone charm.
Check off: “Unlock the supply cabinet in the photolithography lab.”

Turn to the other part of the room and see a Photolithography Etching Machine.Before attempting to work the machine, click on the book that is located on the top of the monitor to the right of the machine. Here you can read the info on the Rapid Prototyper, Circuit Design, and the Photolithography Etching. To work the Etching machine, you will need to follow the 4 steps in the book. We already created the solution, so select it from the inventory and add it to the machine as illustrated in the book under #1. Second you will need a circuit design. Probably going to need some help from Ryan getting that. You can also talk on the intercom next to the door, but no answer.
Check off: “Explore the Photolithography Lab”

Let’s finish snooping in the Tesla Coil Lab (The Metal Door with the Warning on it, in the lab)
Back to: HOME PAGE